I’ve been asked several times to demonstrate how I built up the Winter Skorne bases. I’ve answered the questions, but I thought I’d flood a post with pictures of the process.
I layered thin cork to prop up the feet and create a rocky outcropping type base. Sand fills the gaps nicely. There’s no need to be super neat about the process because it will be mostly covered with snow and ice.
 Â
 

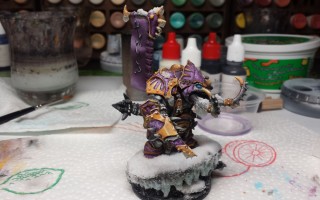
Prime and paint.
 Â
 
I use nail acrylic, a monomer and polymer mix, for the build up of ice. Â More monomer will made a sludgy ice, and less monomer will make a crunchy type of ice.
 Â
 
I use a sculpting tool to drag the acrylic across the areas that I need ice. The monomer will melt plastics and gum up brushes. Keep your good brushes far away from the stuff. It will also take the paint off of the model, so you need a quick hand at adding the acrylic without completely dragging the paint off of the base. It comes down to practice with it.
 Â
 
If you want, you can keep adding to the acrylic to lengthen the icicles. You can even carve it with a Dremel. I fiddled with it while it was still half cured and let it be.
This stuff dries a bit hazy so the next step is to paint the ice a bit. I’ve used a pearl white mixed with a light blue. I didn’t cover the acrylic with paint completely, it’s more of a highlight, just short of drybrushing. Â This pic is out of order.. I got ahead of myself and added snow before painting.

Now it’s time to add the snow. I use Woodland Scenics brand snow. I know that white glue is sufficient for adding snow but I wanted to work quickly, so I use Gorilla Super Glue. I add a thick layer, being careful not to breathe too deeply over the base, then submerge the whole base in a container of snow. I leave it until the glue dries, which isn’t that long, and repeat the process as needed. A few thin layers of Dull Cote is then sprayed. The Dull Cote holds the top coat of snow down a bit more without weighing it down.
 Â
 
The last step is to drag Vallejo Water Effects over the acrylic. The water effects come out white and thick, like a heavy shaving cream or toothpaste. After 24 hours it will go clear. The time to cure depends on how thick you leave it. I pile it on, covering the acrylic and then set on a shelf, away from dust, hair, etc…. because everything will want to stick to the clear water effects.
 Â
 

With this model, I went back after the water effects had cured and added more to lengthen and thicken the clear part of the icicle. The finished product:
